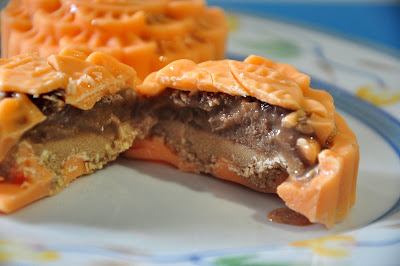
Coffee Ice-Cream Mooncake
Sunday, July 19, 2009
I am so tempted to try on mooncakes this year. Since there is still plenty of time till the festival, I took the opportunity to venture into mooncakes making earlier in order to create a better looking ones to bring back to my hometown when the date of the day is nearer. Why? Hmm.. nowadays I tend to love home-made stuffs more so trying to be special this year. Instead of buying mooncakes for parents and sis; I hope I can hand-made them. *Keep fingers crossed that my 'ambition' will come true ya*
I had many mistakes while making this ice-cream mooncakes. First mistake, I sort of over whipped my cream.; ended up they sort of becoming lumpy. Second mistake came while making the mooncakes skin, I didn't timed myself properly. Instead of 5 minutes, I totally forgotten about it and started to wander around the house doing other stuffs, ended up they became whole chunk of chocolate in the form of mooncakes. Sigh, what a disappointment! I needed to re-double boiled the chocolate again. Grrrr... More works and more headache! So can you imagine the mess that I created for myself? So frustrated and time consuming. Point for learning - never cook/do anything when you're moody and sleepy. That's exactly what I was before starting my mooncakes project.
So this morning, I woke up and opened my freezer to look at the pathetic ice-cream mooncakes of mine. I had lots of difficulty taking them out of the mould especially one particular mooncake. I think it might be due to reason that the skin were too thick. No wonder mooncakes cost so much outside. So many work to do in order to have a nice looking mooncakes. Now I am having thoughts in my mind "Will I succeed in my goal of making good mooncakes for Mum,Daddy and Sis?" Pray hard for that...
 Ice-cream started to melt already when I cut the mooncake. The skin cracked too while slicing the mooncake. Hmm.. Any better ways to cut it nicely to avoid such crack?
Ingredients
Ice-cream Filling
(A)
150 ml fresh milk
2 tbsp instant coffee granules
(B)
4 egg yolks
60 g caster sugar
(C)
200g non-dairy whipped cream
(D)
2 tbsp of Kahlua
40g chocolate rice
Skin Layer
300g orange flavoured cooking chocolate
200g white cooking chocolate
Methods
- Bring (A) to a warm boil (60 Celsius).
- Beat (B) till consistency is slightly thick. Pour (1) from a height into the whisked mixture and mix well. Pour mixture into a pot, double boil till the mixture is thick (resemble runny kaya). Cool the mixture.
- Combine (2) and (D). Add in (C). Keep them chilled for later use.
- Double-boil (E) till melting point. Drizzle into chilled mooncake moulds till full. Level surface and leave chocolate to cool slightly. Once the chocolate coated the side of the moulds, invert the mould. Excess chocolate would drain out leaving hollow centres. Keep moulds freezed for 5 minutes. Remove, drizzle in chocolate once more to the brim. Repeat process of cooling and draining out once more. This steps gives the mooncakes a thicker chocolate skin.
- Put (3) into a pipping bag or spoon the mixture to the center to fill it near to the brim. Knock out excess air. Drizzle some extra cooled (4) on the top and knock out excess air. Use a scrapper to level the top before keeping the mooncakes chilled for a night.


1 comments:
wow! thats really creative! chocolate as the mooncake skin huh? really interesting! i wonder if it works well with snow skin n ice cream.
i was totally mooncaked this year. i made my very first snow skin mooncake last week and since it was a success , i'm gonna try makin ice cream mooncake next.
i think the skin cracked cuz perhaps it was too cold and hard when you cut it? or maybe you can experiment another round with a thinner layer of chocolate coating. hmm...i wonder if dipping your knife in hot water n wipe it dry before cutting will make any difference, i know it sure did for cheesecakes. hope the next round of mooncake making will be a better one than this. practice makes perfect :)
thanks for sharing the recipe!
Post a Comment